How to make a set of BIAS probes
In the process of making some new BIAS probes for testing idle currents in valve amps I decided to hastily document the process for anyone else out there wishing to build something similar. I've seen plenty of different types of probes out there, from the downright dangerous to the ludicrously expensive.
I took a handful of parts plus some 5 minute epoxy, plenty of patience and some tricky soldering to make 4 new probes to replace my previous aging ones, one of which had a broken keyway.
This project shall be documented mainly in pictures with a minimum of text due to the usual time restraints.
Parts:
RS part number 402-715 Octal Relay Socket
Multicomp TEST-7CN Test Pin
Vishay Dale RS02B1R000FE70 Wirewound 1Ohm Resistor
Antique Electronics part number P-SP8-476 Octal Base
20AWG tinned copper wire
5 minute epoxy
3mm heatshrink
 |
| Main parts |
|
|
|
|
Take the Octal Relay Socket and drill out the bottom, widening the hole as much as possible. I used a step bit in a hand drill for this job. Doesn't matter if it's messy, it will be hidden away once completed. File out with a half round file if you need to clean it up a bit.
 |
| Bottom of Socket drilled out |
Drill a 2.5mm hole in the side of the Socket body, make sure that when the top is done up tight it will align roughly with Pin 8. I also drilled out the slot next to the brass insert to 2.5mm, these 2 holes will take the Test Pin ceramic bases.
 |
| Holes drilled for Test Pins |
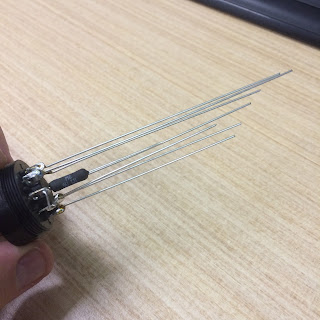
Prepare some 20AWG or similar tinned copper wire (hint for straightening, cut a length, put one end in vise, one end in bull nose pliers and 'snap'it taut a couple of times, it will straighten nicely). Notice that the lengths I have cut get progressively shorter, this is to aid in the insertion process, one at a time goes much more easily into the Octal Base than all wires at once.
 |
| Wires and resistor prepared |
Solder wires around the socket, making sure that the resistor is on Pin 8 and the wires step progressively from shortest to longest.
 |
| Soldered |
Had to extend the resistor lead slightly, added heat shrink to everything, be sure that heat shrink is not too long or the socket and base will have difficulty fitting together. Ensure that resistor lead has space for solder joint either side of the resistor body. In the photo below you can see that I have trimmed the resistor lead and shaped it to meet up with the top 2.5mm hole previously drilled in the Socket body.
 |
| Heat Shrinked! |
I have filled up the keyway in the Octal Base with epoxy, this should stop it from breaking quite so easily. something keyways are prone to if they are in and out of amps all the time.
 |
| Epoxy being injected |
 |
| Epoxy drying |
Now to put all the parts together, add some epoxy into the threads of the Octal Relay Base and then screw together, making absolutely sure that the resistor lines up with the 2x 2.5mm holes drilled in the Socket body.
 |
| More Epoxy |
Now, this is the trickiest part and also the part I have neglected to photograph for your convenience! (Apologies, but you should be able to work it out). Once the Base is glued and screwed onto the Relay Socket Body it is time to gently push some of the wires out of the way, insert a Test Pin nto the hole nearest the 'top' of the socket and very carefully use a slender soldering iron to get some solder flowing between the Test Pin and the protruding little bit of remnant lead from the resistor. This can be very frustrating and could be refined further as a process, I leave that up to you. Once the upper Test Pin is in place you can position the lower Test Pin which should be much easier owing to its position. Solder this to the other side of the resistor to give you your test clip points. Gently reshape the remaining wires and prepare to insert the whole lot into the Octal Base. Previously I have 'potted' the whole assembly with silicon but I have decided not to do that this time, it may have been overkill.
Epoxy the two parts together ensuring that all wires go into their respective holes and that the resistor is on PIN 8. Let the epoxy cure, trim the leads and solder up the pins. Test for continuity and of course your 1Ohm at PIN 8. You might also want to dab a little epoxy around the bases of the Test Pins so they do not move.
 |
| Almost there |
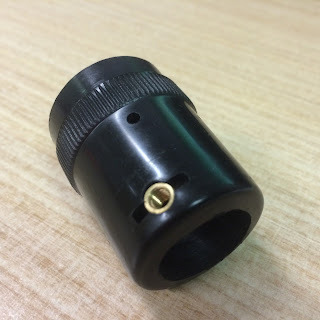
And there we have it, a batch of my ugly but functional BIAS probes.
 |
| Finished product, a bit messy but they work well |


